

Unlocking Your SEO’s Secret Weapon: A Technical SEO Mastery Guide
Search engines are smarter than ever, yet they still heavily rely on a website’s hidden structure. While content and backlinks are vital, technical SEO ensures your site is crawlable, indexable, and fast—all crucial for search visibility. Ignoring this foundation in 2025 is a critical misstep.
This comprehensive guide reveals exactly what technical SEO is, why it’s a cornerstone of digital success, and how to implement a step-by-step checklist for the current and future digital landscape. Whether you’re a developer, marketer, or site owner, these strategies will empower you to build a truly search-friendly website that performs at its peak.
What is Technical SEO and Why It Matters in 2025: The Engine Under the Hood
At its core, what is technical SEO? It’s the process of optimizing a website’s infrastructure for efficient crawling, indexing, and understanding by search engine bots. Unlike on-page or off-page SEO, technical SEO focuses purely on your site’s underlying code and server-side elements. It’s about perfecting the mechanics so all other SEO efforts can thrive.
Why Is Technical SEO Crucial in 2025?
Even brilliant content goes unnoticed if your site can’t be crawled or loads too slowly. As we step into 2025, technical SEO is non-negotiable. Google’s evolving algorithm increasingly prioritizes user experience, site performance, mobile-friendliness, and secure Browse—all pillars of technical SEO. Websites neglecting these technical aspects will struggle for prominent rankings, missing vital organic traffic.
Key Technical SEO Factors You Shouldn’t Ignore: Building a Solid Foundation
Let’s explore the core technical SEO factors that can make or break your website’s visibility and overall performance in search results. Each of these elements contributes significantly to how search engines perceive and rank your site.
Fix Crawlability Issues Step by Step
If search engine bots can’t effectively crawl your website, your valuable pages may never appear in search results, rendering all your content efforts futile. Common crawlability issues include broken internal links, inefficient or poor URL structures, disallowed sections in your robots.txt file, or orphaned pages that are not linked from anywhere else on your site. Addressing these issues systematically is paramount.
Here’s a step-by-step guide to fix crawlability issues:
- Use a crawler tool like Screaming Frog SEO Spider or Sitebulb to perform a comprehensive scan of your entire website. This will identify broken links, redirect chains, and other crawl errors.
- Check for broken links (404 errors) or excessively long redirect chains (more than 2-3 hops). Implement 301 redirects for permanent moves and fix internal links pointing to non-existent pages.
- Ensure all important pages are internally linked. Pages that are not linked from anywhere else (orphaned pages) are unlikely to be discovered by crawlers. Create a logical internal linking structure.
- Submit and regularly check your XML sitemap in Google Search Console (GSC). Monitor the “Index Coverage” report for any Excluded or Error statuses.
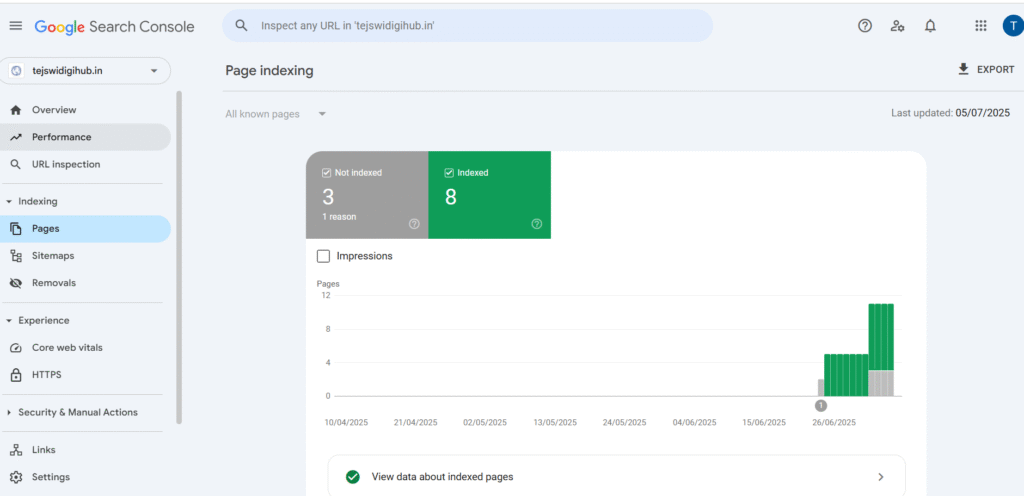
This is how you can check your indexed pages status in Google Search Console
- Carefully review your robots.txt file for misconfigured Disallow directives. Ensure you’re not accidentally blocking crucial sections or files (like CSS or JavaScript) that search engines need to render your pages.
- Analyze server logs to understand how frequently search engines crawl your site and if they are encountering any issues.
Fixing these issues ensures search engines can efficiently find and understand every corner of your site, maximizing its potential for indexing.
Optimize Robots.txt and Sitemap.xml Effectively
Both your robots.txt file and your XML sitemap play absolutely critical roles in directing search engine behavior and managing your crawl budget.
Robots.txt Best Practices:
- Do not block important pages or essential assets like CSS/JS files. Search engines need to access these to render your pages accurately and understand their layout and functionality.
- Use Disallow directives carefully and only for content you truly do not want indexed. This includes admin panels, internal search results, or duplicate content.
- Test your robots.txt file using Google’s robots.txt Tester tool within Google Search Console to ensure it’s functioning as intended and not inadvertently blocking valuable content.
- Always specify the location of your XML sitemap at the end of your robots.txt file using the Sitemap: directive (e.g., Sitemap: https://www.yourdomain.com/sitemap.xml).
How to Optimize Sitemap.xml:
- Include only canonical, index-worthy pages in your sitemap. Avoid including pages with noindex tags, 404s, or redirected URLs.
- Update it regularly. Your sitemap should reflect the most current state of your website, including new pages, deleted pages, and changes to existing ones. Many CMS platforms offer plugins or built-in features for automatic sitemap generation.
- Submit it to Google Search Console and Bing Webmaster Tools. This directly signals to search engines that your site has been updated and helps them discover new content faster.
- For very large websites, consider splitting your sitemap into multiple smaller sitemaps and using a sitemap index file if your sitemap exceeds Google’s recommended limits (50,000 URLs or 50MB).
An effective robots.txt and sitemap.xml configuration significantly improves crawl efficiency and ensures proper, timely indexing of your most important content.
Canonical Tag Usage and Optimization
Duplicate content can be a major SEO problem, especially for large e-commerce sites, content management systems that generate multiple URLs for the same content (e.g., ?category=x&product=y), or multi-language websites with similar content variations. Canonical tags are a powerful solution that helps solve this by pointing to the preferred, “master” version of a page when multiple URLs contain identical or very similar content.
To optimize canonical tags effectively:
- Identify all instances of duplicate or near-duplicate content across your website. This might include pages accessible via both HTTP and HTTPS, www and non-www versions, pages with tracking parameters, or product pages with minor variations (e.g., color).
- Choose the single preferred (canonical) URL for each set of duplicates. This is the version you want search engines to crawl and rank.
- Place the <link rel=”canonical” href=”[canonical URL]” /> tag in the <head> section of all duplicate pages, ensuring it points accurately to the chosen canonical URL.
- Use absolute URLs (e.g., https://example.com/page), not relative ones, within your canonical tags to avoid ambiguity.
- Avoid conflicting signals, such as having multiple canonical tags on a single page, or canonical tags pointing to a 404 error page or a redirected URL.
- Implement self-referencing canonicals for unique pages. For pages that are not duplicates, it’s generally good practice to include a canonical tag that points back to themselves.
Proper canonical tag usage consolidates ranking signals, prevents search engines from getting confused by duplicate content, and avoids issues like index bloat, ensuring your site’s authority is correctly attributed.
Want to learn overview of all SEO strategies

Types of Technical SEO Optimization Techniques: Enhancing Performance
Now that we’ve covered the foundational elements that ensure crawlability and indexability, let’s explore various technical SEO types and how they directly impact your website’s performance and user experience. These techniques move beyond basic accessibility to actively improve how your site functions for both bots and human visitors.
Improve Core Web Vitals for Better User Experience
Google’s Core Web Vitals have evolved into critical ranking factors, signaling Google’s strong emphasis on actual user experience. These metrics specifically focus on three key aspects of page loading, interactivity, and visual stability:
- Largest Contentful Paint (LCP): Measures perceived load speed. It marks the point when the largest content element on the screen becomes visible.
- First Input Delay (FID): Measures responsiveness. It quantifies the time from when a user first interacts with a page (e.g., clicking a button) to when the browser is actually able to respond to that interaction.
- Cumulative Layout Shift (CLS): Measures visual stability. It quantifies the unexpected shifting of page content while it is loading.
Here’s a step-by-step guide to improve Core Web Vitals performance:
To optimize Largest Contentful Paint (LCP):
- Optimize server response times: A fast hosting provider, optimized backend code, and efficient database queries can significantly reduce the time it takes for your server to respond.
- Use a Content Delivery Network (CDN): CDNs serve static assets (images, CSS, JS) from servers geographically closer to your users, reducing latency.
- Compress and optimize large images and videos: These are often the largest content elements.
- Minify CSS and JavaScript and defer non-critical resources: This reduces render-blocking resources that delay LCP.
- Preload critical assets: Tell the browser to prioritize loading essential fonts or images.
To improve First Input Delay (FID):
- Minimize JavaScript execution time: Long-running JavaScript tasks can block the main thread, making your page unresponsive. Break up long tasks, defer non-critical JS, and consider using web workers.
- Optimize third-party scripts: Scripts from ads, analytics, or social media widgets can heavily impact FID. Audit their performance and consider asynchronous loading.
To reduce Cumulative Layout Shift (CLS):
- Always set explicit dimensions (width and height) for images and video elements. This reserves the necessary space, preventing content shifts as media loads.
- Avoid inserting content above existing elements, especially ads or dynamically injected content, unless it’s a direct user interaction.
- Preload web fonts and use font-display: swap; to prevent flashes of unstyled text (FOUT) or invisible text (FOIT) that can cause layout shifts.
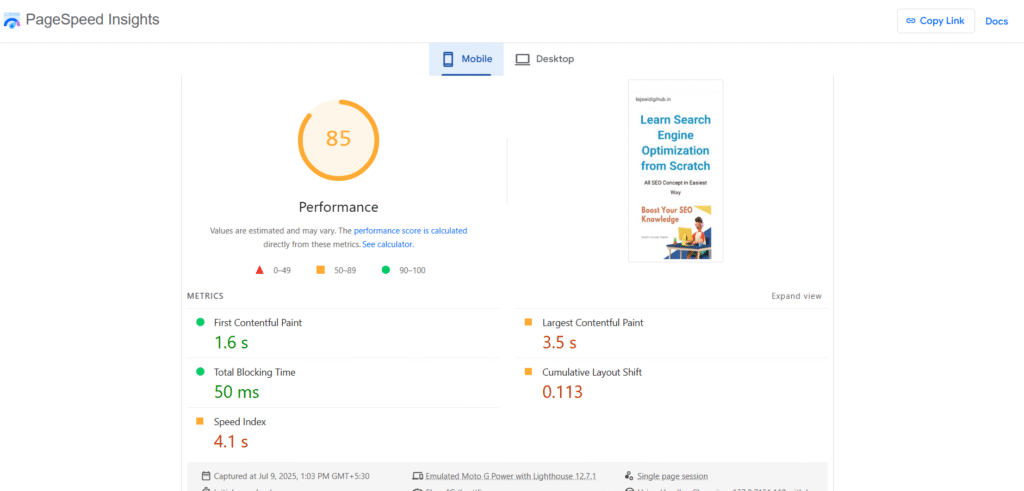
You can monitor your Core Web Vitals using tools like Google PageSpeed Insights, Lighthouse (built into Chrome DevTools), and the dedicated Core Web Vitals report within Google Search Console. Consistent monitoring and optimization are key to maintaining “Good” scores.
Minify CSS and JavaScript
Excessive, unoptimized CSS and JavaScript files can significantly slow down your site’s rendering and loading times. Minification involves removing all unnecessary characters from code – such as white spaces, comments, line breaks, and unused code – without changing its functionality. This reduces file size, leading to faster download and execution times for browsers.
Tools to Minify CSS and JavaScript:
- Online Minifiers: Many free online tools can minify CSS and JS code.
- Build Tools for Developers: UglifyJS, CSSNano, Terser, Gulp.js, and Webpack are common tools used in development workflows for automatic minification.
- CMS Plugins: For platforms like WordPress, plugins such as WP Optimize, Autoptimize, or LiteSpeed Cache can automate the minification process without requiring manual code changes.
- Server-Side Configuration: Some servers can be configured to automatically minify resources before serving them.
Implementing minification can shave precious milliseconds, or even seconds, off your page load times—a huge deal for both user experience and search engine rankings.
Image Compression Techniques
Uncompressed or oversized images are one of the most common and easily fixable causes of slow websites. Using the right image compression techniques reduces file size dramatically without significantly sacrificing visual quality. This directly impacts page speed and, consequently, your Core Web Vitals.
Best Practices for Image Compression:
- Use next-gen image formats like WebP or AVIF. These modern formats offer superior compression compared to traditional JPEGs and PNGs while maintaining high visual fidelity.
- Resize images to match their display dimensions. Never upload a 4000px wide image if it will only be displayed at 800px. Resize images before uploading them to your server.
- Compress images using specialized tools. Desktop software (e.g., Adobe Photoshop “Save for Web” feature) or online tools like TinyPNG, Squoosh, or ImageOptim can provide significant file size reductions.
- Implement lazy loading for off-screen images. This technique ensures that images below the fold only load when they are about to become visible in the user’s viewport, speeding up initial page load.
- Use responsive images (srcset and sizes attributes) to serve different image versions based on the user’s device and screen size.
Remember, fast-loading images mean happier users, reduced bounce rates, and better Core Web Vitals scores, all contributing to improved SEO performance.
Enable Browser Caching
Caching is a powerful technique that significantly improves website speed for repeat visitors. Enabling browser caching instructs a user’s web browser to store frequently used files (like images, CSS, JavaScript, and fonts) locally on their device. When the user revisits your site, their browser can load these files from their local cache instead of re-downloading them from your server, resulting in much faster page load times.
How to Enable Browser Caching:
- On Apache Servers: You can configure caching rules by adding Cache-Control and Expires headers in your .htaccess file.
- On NGINX Servers: Modify your NGINX configuration files (e.g., nginx.conf) within location blocks to add caching rules and set appropriate expires headers.
- For WordPress Sites: Plugins like W3 Total Cache, WP Super Cache, or LiteSpeed Cache offer easy-to-use interfaces to configure browser caching without manual code editing.
- Content Delivery Networks (CDNs): Many CDNs also offer robust caching capabilities that can be configured to cache your site’s static assets at their edge locations, further improving speed.
Enabling browser caching not only improves page speed for returning visitors but also reduces the load on your server—critical for both SEO and overall user experience.
Technical SEO Schema Implementation Guide
Schema markup (also known as structured data) is a standardized vocabulary that you can add to your website’s HTML to help search engines better understand the meaning and context of your content. While it doesn’t directly boost rankings, it is absolutely essential for enhancing how your pages appear in search results—often leading to eye-catching features like star ratings for product reviews, detailed recipe information, or direct answers for FAQs, collectively known as rich results.
Technical SEO Schema Implementation Guide:
- Identify Relevant Schema Types: Start by determining which types of content on your website can benefit from structured data. Common and highly beneficial types include:
- Article: For blog posts, news articles, etc.
- Product: For e-commerce product pages.
- Review: For reviews of products, services, or places.
- LocalBusiness: For physical business locations.
- FAQPage: For pages with a list of questions and answers.
- HowTo: For step-by-step instructions.
- BreadcrumbList: For navigation paths.
- VideoObject: For embedded video content.
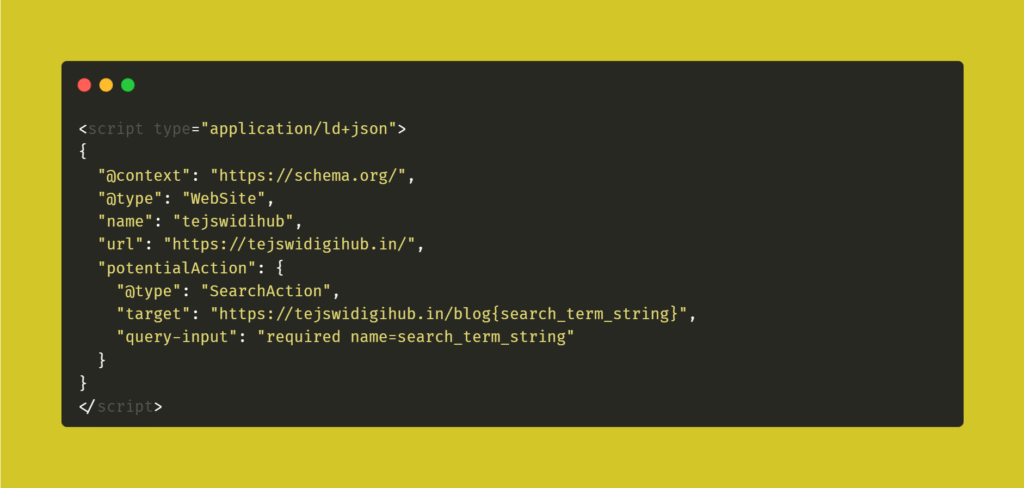
- Choose Implementation Method (JSON-LD Recommended):
- JSON-LD (JavaScript Object Notation for Linked Data) is Google’s preferred method. It involves adding a JavaScript object directly into the <head> or <body> section of your HTML, separate from the visible content. This makes it clean and easy to manage.
- Microdata and RDFa involve adding attributes directly within HTML tags, which can be more cumbersome to implement and maintain.
- Generate Schema Markup:
- You can manually write JSON-LD code if you’re comfortable with it.
- Use Google’s Structured Data Markup Helper to generate basic schema code by highlighting content on your page.
- Many SEO plugins for CMS platforms (like Yoast SEO or Rank Math for WordPress) offer built-in features to add various schema types easily.
- Add Markup to Your HTML: Place the generated JSON-LD script within the <head> or <body> tags of the specific pages where the schema applies.
- Test and Validate Your Schema:
- Google’s Rich Results Test tool is indispensable. Paste your URL or code snippet, and it will validate your schema, showing you which rich results (if any) your page is eligible for.
- Use the Schema Markup Validator by Schema.org for broader validation against the Schema.org vocabulary.
- Avoid Spammy or Misleading Markup: Only mark up content that is actually visible on the page. Misleading schema can lead to manual penalties from Google.
- Monitor Performance in Google Search Console: After implementing schema, keep an eye on the “Enhancements” section in GSC. You’ll see reports for various rich result types, indicating if Google is successfully detecting and using your markup.
Implementing schema doesn’t directly boost core rankings, but it dramatically improves your visibility and can lead to higher click-through rates (CTR) from search results by making your listings more appealing and informative.
Bonus: Pro Tips to Future-Proof Your Site’s Technical SEO
The technical SEO landscape evolves constantly, driven by advancements in search engine algorithms and user expectations. To not just keep up, but to stay ahead, consider these advanced practices to future-proof your site’s technical SEO:
- Regularly update your CMS and plugins: Outdated software can introduce security vulnerabilities and performance bottlenecks, impacting technical SEO.
- Monitor uptime and server performance consistently: Use monitoring tools to ensure your site is always accessible and responding quickly. Downtime or slow server response can severely impact crawlability and user experience.
- Conduct speed audits every few months: Don’t just audit once. Regularly use tools like GTmetrix, WebPageTest, and Lighthouse to pinpoint new performance issues that might arise from content updates, new features, or third-party scripts.
- Create clean, flat URL structures: Aim for URLs that are human-readable, logical, and as short as possible, clearly indicating the page’s content. Avoid excessively long URLs with numerous parameters.
- Enable HTTP/2 or HTTP/3 for faster loading: These newer protocols offer significant performance advantages over HTTP/1.1 by allowing multiple requests to be sent over a single connection. Most modern hosting providers support them.
- Avoid overusing third-party scripts: Each external script (analytics, ad networks, social widgets) adds overhead and can slow down your site. Audit them regularly and remove any that are not essential.
- Keep learning and stay informed: Follow official Google SEO blogs, industry news sources, and reputable SEO experts. The rules of the game are always changing, and staying informed is your best defense against algorithmic shifts.
- Consider Server-Side Rendering (SSR) or Static Site Generation (SSG) for JavaScript-heavy sites: If your site heavily relies on JavaScript to render content, ensure it’s fully crawlable. SSR and SSG pre-render content on the server, making it instantly available to crawlers and improving initial load times.
- Implement Hreflang tags for international SEO: If you target multiple languages or regions, correctly implementing hreflang attributes is crucial for telling search engines about alternative versions of your content for different audiences, preventing duplicate content issues across locales.
When all technical SEO types work in harmony, your site becomes a magnet for both users and search engines, creating a virtuous cycle of improved rankings, increased traffic, and better user satisfaction.
Conclusion: Build a Technically Sound Website to Win in 2025
In 2025, a site with great content but poor technical foundations is a non-starter. Technical SEO isn’t an add-on; it’s the fundamental infrastructure for all digital marketing.
Understanding what technical SEO is and applying its principles ensures your site is visible, fast, and scalable. Use the technical SEO checklist for 2025 provided here for regular audits. By perfecting your site’s technical aspects, you build a robust foundation for organic growth, securing your place in the competitive digital landscape.